36 KiB
First steps with the FINAL CUT widget toolkit
Table of Contents
- Basic functions
- How to use the library
- Memory Management
- Event Processing
- Signals and Callbacks
- Callback function
- Callback lambda expression
- Callback method
- Custom signals
- Widget layout
- Scroll view
Basic functions
FINAL CUT is a library for creating text-based terminal applications. It runs on several Unix-like platforms. The release of FINAL CUT is licensed under the terms of the GNU Lesser General Public License v3.0 (GNU LGPL v3), which allows flexible licensing of applications. FINAL CUT was written in the programming language C++. The object-oriented design allows the creation of fast and lean programs.
FINAL CUT is a widget toolkit. A user interface usually consists of several widgets. FINAL CUT draws widgets on virtual windows and then mapped them on a virtual terminal. It uses the terminal capabilities from the Termcap library to display the character matrix of the virtual terminal on the screen or a terminal emulator. It uses various optimization methods to improve the drawing speed.

How to use the library
At the beginning of this introduction to the FINAL CUT we will start with a small example.
The following example creates an empty 30×10 character dialog.
File: dialog.cpp
#include <final/final.h>

int main (int argc, char* argv[])
{
  finalcut::FApplication app(argc, argv);
  finalcut::FDialog dialog(&app);
  dialog.setText ("A dialog");
  const finalcut::FPoint position(25, 5);
  const finalcut::FSize size(30, 10);
  dialog.setGeometry (position, size);
  app.setMainWidget(&dialog);
  dialog.show();
  return app.exec();
}
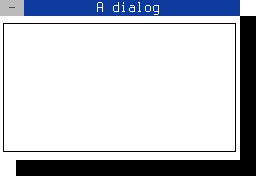
(Note: You can close the dialog with the mouse, Shift+F10 or Ctrl+^)
After entering the source code in dialog.cpp you can compile the above program with gcc:
g++ -O2 -lfinal dialog.cpp -o dialog
How it works
#include <final/final.h>
All final cut programs must include the final.h header.
finalcut::FApplication app(argc, argv);
This line creates the finalcut::FApplication object app with
the command line arguments argc and argv. This object manages
the application main event loop. It receives keyboard and mouse events
and sends them to the target widgets. You must create an application
object before you can create a widgets object.
The next line
finalcut::FDialog dialog(&app);
creates the finalcut::FDialog object dialog with the object app
as parent object. The finalcut::FDialog class is the base class for
creating dialog windows.
dialog.setText ("A dialog");
The title bar of the dialog box gets the text "A dialog".
finalcut::FPoint position(25, 5);
finalcut::FSize size(30, 10);
dialog.setGeometry (position, size);
The dialog window gets a width of 30 and a height of 10 characters. The position of the window in the terminal is at x=25 and y=5 (note: x=1 and y=1 represents the upper left corner).
app.setMainWidget(&dialog);
The dialog object was now selected as the main widget for the application.
When you close the main widget, the entire application quits.
dialog.show();
A window or widget is not visible directly after its creation.
Only the call of show() makes it (and its child objects,
if available) visible.
return app.exec();
The last line calls exec() to start the application and return
the result to the operating system. The started application enters
the main event loop. This loop does not end until the window is
not closed.
Memory Management
To create a hierarchy of FObjects (or derived classes/widgets), a new FObject must initialize with its parent object.
FObject* parent = new FObject();
FObject* child  = new FObject(parent);
To deallocate the used memory of a parent FObject, the allocated memory of its child objects will also automatically deallocate.
An object can also be assigned to another object later via addChild().
FObject* parent = new FObject();
FObject* child = new FObject();
parent->addChild(child);
The child object assignment can also remove at any time with
delChild().
FObject* parent = new FObject();
FObject* child  = new FObject(parent);
parent->delChild(child);
If an FObject with a parent will remove from the hierarchy, the destructor automatically deletes the object assignment from its parent object. If a class object doesn't derive from FObject, you must implement storage deallocation yourself.
File: memory.cpp
#include <final/final.h>

using namespace finalcut;

int main (int argc, char* argv[])
{
  FApplication app(argc, argv);

  // The object dialog is managed by app
  FDialog* dialog = new FDialog(&app);
  dialog->setText ("Window Title");
  dialog->setGeometry (FPoint(25, 5), FSize(40, 8));

  // The object input is managed by dialog
  FLineEdit* input = new FLineEdit("predefined text", dialog);
  input->setGeometry(FPoint(8, 2), FSize(29, 1));
  input->setLabelText (L"&Input");

  // The object label is managed by dialog
  FLabel* label = new FLabel ( "Lorem ipsum dolor sit amet, consectetur "
                               "adipiscing elit, sed do eiusmod tempor "
                               "incididunt ut labore et dolore magna aliqua."
                             , dialog );
  label->setGeometry (FPoint(2, 4), FSize(36, 1));
  app.setMainWidget(dialog);
  dialog->show();
  return app.exec();
}
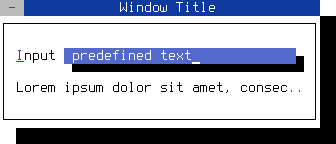
(Note: You can close the window with the mouse, Shift+F10 or Ctrl+^)
After entering the source code in memory.cpp you can compile the above program with gcc:
g++ -O2 -lfinal memory.cpp -o memory
Event Processing
Calling FApplication::exec() starts the FINAL CUT main event loop.
While the event loop is running, the system constantly checks whether
an event has occurred and sends it to the application's currently focused
object. The events of the terminal such as keystrokes, mouse actions or
resizing the terminal are translated into FEvent objects and sent it to
the active FObject. It is also possible to use FApplication::sendEvent()
or FApplication::queueEvent() to send your own events to an object.
FObject-derived objects process incoming events by reimplementing the
virtual method event(). The FObject itself calls only
onTimer() or onUserEvent() and ignores all other events. The
FObject-derived class FWidget also reimplements the event() method
to handle further events. FWidget calls the FWidget::onKeyPress method
when you press a key, or the FWidget::onMouseDown method when you click
a mouse button.
Event handler reimplementation
An event in FINAL CUT is an object that inherits from the base class
FEvent. There are several event types, represented by an enum value.
For example, the method FEvent::type() returns the type
fc::MouseDown_Event when you press down a mouse button.
Some event types have data that cannot store in an FEvent object.
For example, a click event of the mouse must store which button it
triggered where the mouse pointer was at that time. In classes derived
from FEvent, such as FMouseEvent(), we store this data.
Widgets get their events from the event() method inherited from FObject.
The implementation of event() in FWidget forwards the most common event
types to specific event handlers such as FMouseEvent(), FKeyEvent() or
FResizeEvent(). There are many other event types. It is also possible to
create own event types and send them to other objects.
The FINAL CUT event types:
enum events
{
  None_Event,               // invalid event
  KeyPress_Event,           // key pressed
  KeyUp_Event,              // key released
  KeyDown_Event,            // key pressed
  MouseDown_Event,          // mouse button pressed
  MouseUp_Event,            // mouse button released
  MouseDoubleClick_Event,   // mouse button double click
  MouseWheel_Event,         // mouse wheel rolled
  MouseMove_Event,          // mouse move
  FocusIn_Event,            // focus in
  FocusOut_Event,           // focus out
  ChildFocusIn_Event,       // child focus in
  ChildFocusOut_Event,      // child focus out
  WindowActive_Event,       // activate window
  WindowInactive_Event,     // deactivate window
  WindowRaised_Event,       // raise window
  WindowLowered_Event,      // lower window
  Accelerator_Event,        // keyboard accelerator
  Resize_Event,             // terminal resize
  Show_Event,               // widget is shown
  Hide_Event,               // widget is hidden
  Close_Event,              // widget close
  Timer_Event,              // timer event occur
  User_Event                // user defined event
};
File: timer.cpp
#include <final/final.h>

using namespace finalcut;

class dialogWidget : public FDialog
{
  public:
    explicit dialogWidget (FWidget* parent = nullptr)
      : FDialog(parent)
    {
      setText ("Dialog");
      setGeometry (FPoint(25, 5), FSize(23, 4));
      label.setGeometry (FPoint(1, 1), FSize(10, 1));
      label.setAlignment (fc::alignRight);
      value.setGeometry (FPoint(11, 1), FSize(10, 1));
      id = addTimer(100);
    }

  private:
    void onTimer (FTimerEvent* ev) override
    {
      if ( id == ev->getTimerId() && n < 9999999999 )
      {
        value.setNumber(n);
        value.redraw();
        n++;
      }
    }

    FLabel label{"Counter: ", this};
    FLabel value{"0", this};
    long n{0};
    int id{0};
};

int main (int argc, char* argv[])
{
  FApplication app(argc, argv);
  dialogWidget dialog(&app);
  app.setMainWidget(&dialog);
  dialog.show();
  return app.exec();
}

(Note: You can close the window with the mouse, Shift+F10 or Ctrl+^)
After entering the source code in timer.cpp you can compile the above program with gcc:
g++ -O2 -lfinal -std=c++11 timer.cpp -o timer
Signals and Callbacks
The callback mechanism is essential for developing applications with
FINAL CUT. Callback routines allow the programmer to connect different
objects (which do not need to know each other). Connected objects notify
each other when an action occurs in a widget. To uniquely identify a widget
action, it uses signal strings. For example, if an FButton object gets
clicked by a keyboard or mouse, it sends the string "clicked". A signal
handler explicitly provided by Widget, in the form of a callback function
or a callback method, can react to such a signal.
A callback function is always structured as follows:
void cb_function (FWidget* w, FDataPtr data)
{...}
The structure of a callback method is the same:
void classname::cb_methode (FWidget* w, FDataPtr data)
{...}
We use the addCallback() method of the FWidget class to connect
to other widget objects.
For calling functions and static methods:
void FWidget::addCallback ( const FString& cb_signal
                          , FCallback cb_handler
                          , FDataPtr data )
{...}
For calling a member method of a specific instance:
void FWidget::addCallback ( const FString& cb_signal
                          , FWidget* cb_instance
                          , FMemberCallback cb_handler
                          , FDataPtr data )
{...}
There are two macros F_FUNCTION_CALLBACK and F_METHOD_CALLBACK to avoid
having to deal with necessary type conversions. With delCallback() you can
remove a connection to a signal handler or a widget. Alternatively, you can
use delCallbacks() to remove all existing callbacks from an object.
The FINAL CUT widgets emit the following default signals
- FButton
- "clicked"
- FCheckMenuItem
- "clicked"
"toggled" - FLineEdit
- "activate"
"changed" - FListBox
- "clicked"
"row-changed"
"row-selected" - FListView
- "clicked"
"row-changed" - FMenu
- "activate"
- FMenuItem
- "activate"
"clicked"
"deactivate" - FRadioMenuItem
- "clicked"
"toggled" - FScrollbar
- "change-value"
- FSpinBox
- "changed"
- FStatusBar
- "activate"
- FTextView
- "changed"
- FToggleButton
- "clicked"
"toggled" - FWidget
- "destroy"
"focus-in"
"focus-out"
"mouse-press"
"mouse-release"
"mouse-move"
"mouse-wheel-down"
"mouse-wheel-up"
Example of a callback function:
File: callback-function.cpp
#include <final/final.h>

using namespace finalcut;

void cb_changeText (FWidget* w, FDataPtr data)
{
  FButton& button = *(static_cast<FButton*>(w));
  FLabel& label = *(static_cast<FLabel*>(data));
  label.clear();
  label << "The " << button.getClassName() << " was pressed";
  label.redraw();
}

int main (int argc, char* argv[])
{
  FApplication app(argc, argv);
  FDialog dialog(&app);
  dialog.setText ("A dialog with callback function");
  dialog.setGeometry (FRect(25, 5, 45, 9));
  FLabel label (&dialog);
  label = "The button has never been pressed before";
  label.setGeometry (FPoint(2, 2), FSize(41, 1));
  FButton button (&dialog);
  // Character follows '&' will be used as the accelerator key
  button = "&Click me";
  button.setGeometry (FPoint(15, 5), FSize(14, 1));

  // Connect the button signal "clicked" with the callback function
  button.addCallback
  (
    "clicked",
    F_FUNCTION_CALLBACK (&cb_changeText),
    &label
  );

  app.setMainWidget(&dialog);
  dialog.show();
  return app.exec();
}
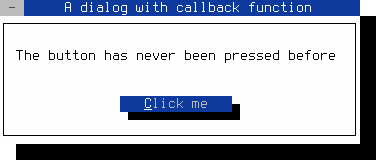
(Note: You can close the dialog with the mouse, Shift+F10 or Ctrl+^)
After entering the source code in callback-function.cpp you can compile the above program with gcc:
g++ -O2 -lfinal callback-function.cpp -o callback-function
Example of an lambda expression callback:
File: callback-lambda.cpp
#include <final/final.h>

using namespace finalcut;

int main (int argc, char* argv[])
{
  FApplication app(argc, argv);
  FDialog dialog(&app);
  dialog.setText ("Lambda expression as callback");
  dialog.setGeometry (FRect(25, 5, 45, 9));
  FButton button ("&bottom", &dialog);
  button.setGeometry (FPoint(15, 5), FSize(14, 1));

  // Connect the button signal "clicked" with the lambda expression
  button.addCallback
  (
    "clicked",
    [] (FWidget* w, FDataPtr d)
    {
      FButton& button = *(static_cast<FButton*>(w));

      if ( button.getY() != 2 )
      {
        button.setPos (FPoint(15, 2));
        button.setText("&top");
      }
      else
      {
        button.setPos (FPoint(15, 5));
        button.setText("&bottom");
      }

      static_cast<FDialog*>(d)->redraw();
    },
    &dialog
  );

  app.setMainWidget(&dialog);
  dialog.show();
  return app.exec();
}
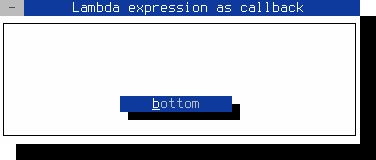
(Note: You can close the dialog with the mouse, Shift+F10 or Ctrl+^)
After entering the source code in callback-lambda.cpp you can compile the above program with gcc:
g++ -O2 -lfinal -std=c++11 callback-lambda.cpp -o callback-lambda
Example of a callback method:
File: callback-method.cpp
#include <final/final.h>

using namespace finalcut;

class dialogWidget : public FDialog
{
  public:
    explicit dialogWidget (FWidget* parent = nullptr)
      : FDialog(parent)
    {
      setText ("Callback method");
      setGeometry (FPoint(25, 5), FSize(25, 7));
      button.setGeometry (FPoint(7, 3), FSize(10, 1));

      // Connect the button signal "clicked" with the callback method
      button.addCallback
      (
        "clicked",
        F_METHOD_CALLBACK (this, &FApplication::cb_exitApp),
        nullptr
      );
    }

  private:
    FButton button{"&Quit", this};
};

int main (int argc, char* argv[])
{
  FApplication app(argc, argv);
  dialogWidget dialog(&app);
  app.setMainWidget(&dialog);
  dialog.show();
  return app.exec();
}
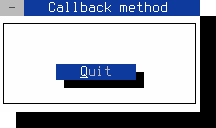
(Note: You can close the window with the mouse, Shift+F10 or Ctrl+^)
After entering the source code in callback-method.cpp you can compile the above program with gcc:
g++ -O2 -lfinal -std=c++11 callback-method.cpp -o callback-method
Send custom signals
You can use the emitCallback() method to generate a user-defined signal.
You can connect this signal later with the method addCallback() to a
self-defined routine.
File: emit-signal.cpp
#include <final/final.h>

using namespace finalcut;

class dialogWidget : public FDialog
{
  public:
    explicit dialogWidget (FWidget* parent = nullptr)
      : FDialog(parent)
    {
      setGeometry (FPoint(25, 5), FSize(22, 7));
      setText ("Emit signal");
      const FSize size(5, 1);
      label.setGeometry (FPoint(8, 1), size);
      label.setAlignment (fc::alignRight);
      label.setForegroundColor (fc::Black);
      plus.setGeometry (FPoint(3, 3), size);
      minus.setGeometry (FPoint(13, 3), size);
      plus.setNoUnderline();
      minus.setNoUnderline();

      // Connect the button signal "clicked" with the callback method
      plus.addCallback
      (
        "clicked",
        F_METHOD_CALLBACK (this, &dialogWidget::cb_plus)
      );

      minus.addCallback
      (
        "clicked",
        F_METHOD_CALLBACK (this, &dialogWidget::cb_minus)
      );

      // Connect own signals
      addCallback
      (
        "hot",
        F_METHOD_CALLBACK (this, &dialogWidget::cb_set_red)
      );

      addCallback
      (
        "regular",
        F_METHOD_CALLBACK (this, &dialogWidget::cb_set_black)
      );

      addCallback
      (
        "cold",
        F_METHOD_CALLBACK (this, &dialogWidget::cb_set_blue)
      );
    }

  private:
    void cb_plus (FWidget*, FDataPtr)
    {
      if ( t < 100 )
        t++;

      if ( t == 30 )
        emitCallback("hot");
      else if ( t == 1 )
        emitCallback("regular");

      setTemperature();
    }

    void cb_minus (FWidget*, FDataPtr)
    {
      if ( t > -99 )
        t--;

      if ( t == 0 )
        emitCallback("cold");
      else if ( t == 29 )
        emitCallback("regular");

      setTemperature();
    }

    void cb_set_blue (FWidget*, FDataPtr)
    {
      label.setForegroundColor (fc::Blue);
    }

    void cb_set_black (FWidget*, FDataPtr)
    {
      label.setForegroundColor (fc::Black);
    }

    void cb_set_red (FWidget*, FDataPtr)
    {
      label.setForegroundColor (fc::Red);
    }

    void setTemperature()
    {
      label.clear();
      label << t << "°C";
      label.redraw();
    }

    int t = 20;
    FLabel label{FString() << t << "°C", this};
    FButton plus {"&+", this};
    FButton minus {"&-", this};
};

int main (int argc, char* argv[])
{
  FApplication app(argc, argv);
  dialogWidget dialog(&app);
  app.setMainWidget(&dialog);
  dialog.show();
  return app.exec();
}
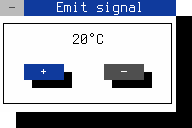
(Note: You can close the window with the mouse, Shift+F10 or Ctrl+^)
After entering the source code in emit-signal.cpp you can compile the above program with gcc:
g++ -O2 -lfinal -std=c++11 emit-signal.cpp -o emit-signal
Widget layout
Coordinates
The positioning of a widget in the terminal works via a coordinate
system. It consists of x characters in the horizontal and y
characters in the vertical. The upper left corner has the coordinates
(1, 1). With the commands getDesktopWidth() and getDesktopHeight(),
the width and height of the terminal get retrieved. These two values
result in the position of the lower right terminal corner. The position
of a widget is retrievable with getX(), getY(), and getPos() or
is definable with setX(), setY(), and setPos(). The data type for
each coordinate is an int. All positions represent an FPoint
object. The positioning of the widget is always relative to its parent
widget. The top parent widget in a chain of children contains the
terminal desktop. There the absolute terminal positions are still
identical to the relative positions (getPos() = getTermPos()). In
the case of a child widget, the positioning is corresponding to the
upper left corner of the parent widget plus a possible padding space
(can be determined with getLeftPadding() and getTopPadding()).
If you want to ignore padding spaces, you must force this with the
ignorePadding() method.

int              getX() const;
int              getY() const;
const FPoint     getPos() const;
int              getTermX() const;
int              getTermY() const;
const FPoint     getTermPos() const;
virtual void     setX (int x, bool adjust = true);
virtual void     setY (int y, bool adjust = true);
virtual void     setPos (const FPoint& p, bool adjust = true);
If you set the value of adjust to false when calling setX(),
setY(), or setPos(), this will prevent the explicit call of
adjustSize() afterward. This is important to avoid adjustSize()
loops or to block the adjustSize() call from being repeated
unnecessarily often.
Lengths
The dimensions of a widget can be retrieved and defined separately in
width and height. The methods getWidth() and getHeight()
respectively setWidth() and setHeight() are used for this. Because
a length cannot be negative, all lengths are of type std::size_t.
The maximum size of a child widget automatically results from the size
of the parent widget, which is retrievable with getClientWidth() and
getClientHeight(). Some widgets have a border, a title bar, or both,
which can reduce the maximum size of the child widget.
widget width ≥ client widget width
widget height ≥ client widget height
Corresponding padding space ensures the correct distance here. The
padding space can be retrieved separately for all four sides with
the widget methods getTopPadding(), getLeftPadding(),
getBottomPadding(), and getRightPadding(). You can set the
required padding space for the widget using the setTopPadding(),
setLeftPadding(), setBottomPadding() and setRightPadding()
methods.
widget width = left padding + client width + right padding
widget height = top padding + client height + bottom padding

std::size_t    getWidth() const;
std::size_t    getHeight() const;
std::size_t    getClientWidth() const;
std::size_t    getClientHeight() const;
int            getTopPadding() const;
int            getLeftPadding() const;
int            getBottomPadding() const;
int            getRightPadding() const;
virtual void   setWidth (std::size_t width, bool adjust = true);
virtual void   setHeight (std::size_t height, bool adjust = true);
void           setTopPadding (int top, bool adjust = true);
void           setLeftPadding (int left, bool adjust = true);
void           setBottomPadding (int bottom, bool adjust = true);
void           setRightPadding (int right, bool adjust = true);
If the value of adjust is set to false for setWidth(),
setHeight(), setTopPadding(), setLeftPadding(),
setBottomPadding() or setRightPadding(), then adjustSize() is
not explicitly called afterward. This is important to prevent
adjustSize() loops or to avoid that adjustSize() is called
unnecessarily often.
Areas
The terminal area in which a widget appears determines its geometry.
The geometry of a widget is composed of its position and its size.
A widget position is always of object type FPoint and a widget
size of type FSize. The widget geometry can get as FRect object
via the widget method getGeometry() and set with the method
setGeometry(). The getTermGeometry() method gets the total values
of the terminal geometry.
If you are only interested in the size of a widget, you can also use
the method getSize(). To set the widget size, you can use the method
setSize().
The position of a shadow is outside the widget. The shadow size itself
as FSize object is retrievable via the getShadow() method. You
can set the widget shadow size with the setShadowSize() method. If
you want to get the geometry values of a widget, including its shadow,
you can use the method getGeometryWithShadow() from the FWidget
class. If you want to have the entire geometry with shadow for the
absolute geometry values as a FRect object, you can call the method
getTermGeometryWithShadow().

const FSize    getSize() const;
const FRect&   getGeometry() const;
const FRect&   getTermGeometry();
const FSize&   getShadow() const;
const FRect&   getGeometryWithShadow();
const FRect&   getTermGeometryWithShadow();
virtual void   setSize (const FSize& size, bool adjust = true);
virtual void   setGeometry (const FRect& box, bool adjust = true);
virtual void   setGeometry (const FPoint& p, const FSize& s, bool adjust = true);
virtual void   setShadowSize (const FSize& size);
If you explicitly set the value of adjust to false when
using the setSize(), setGeometry() or setShadowSize()
mutators, the adjustSize() method is no longer called automatically.
This can be used to prevent recursive adjustSize() calls or to
avoid unnecessary adjustSize() calls.
Dynamic layout
A modern terminal emulation like xterm has no fixed resolution.
They offer the possibility to change the height and width of the
terminal at any time. That triggers a resize-event that calls
the adjustSize() method. This method allows adapting the widget
to a changed terminal size. You can override the adjustSize()
method to adjust the size and position of the widget. The method
adjustSize() will also be called indirectly via calling methods
setGeometry(), setX(), setY(), setPos(), setWidth(),
setHeight(), setSize(), setTopPadding(), setLeftPadding(),
setBottomPadding(), setRightPadding(), or setDoubleFlatLine().
Scalable dialogs derived from FDialog can change the dialog size by
clicking on the lower right corner of the window. You can intercept
a scaling action by overriding the setSize() method and adjusting
the client widgets.
File: size-adjustment.cpp
#include <final/final.h>

using namespace finalcut;

class dialogWidget : public FDialog
{
  public:
    explicit dialogWidget (FWidget* parent = nullptr)
      : FDialog(parent)
    {
      setText ("Dialog");
      setResizeable();
      button.setGeometry (FPoint(1, 1), FSize(12, 1), false);
      input.setGeometry (FPoint(2, 3), FSize(12, 1), false);
      // Set dialog geometry and calling adjustSize()
      setGeometry (FPoint(25, 5), FSize(40, 12));
      setMinimumSize (FSize(25, 9));
    }

  private:
    inline void checkMinValue (int& n)
    {
      if ( n < 1 )  // Checks and corrects the minimum value
        n = 1;
    }

    void centerDialog()
    {
      auto x = int((getDesktopWidth() - getWidth()) / 2);
      auto y = int((getDesktopHeight() - getHeight()) / 2);
      checkMinValue(x);
      checkMinValue(y);
      setPos (FPoint(x, y), false);
    }

    void adjustWidgets()
    {
      const auto bx = int(getWidth() - button.getWidth() - 3);
      const auto by = int(getHeight() - 4);
      button.setPos (FPoint(bx, by), false);
      input.setWidth (getWidth() - 4);
      const auto ly = int(getHeight() / 2) - 1;
      input.setY (ly, false);
    }

    void adjustSize() override
    {
      // Calling super class method adjustSize()
      FDialog::adjustSize();
      // Centers the dialog in the terminal
      centerDialog();
    }

    void setSize (const FSize& size, bool) override
    {
      // Calling super class methods setSize() + adjustSize()
      FDialog::setSize (size, false);
      FDialog::adjustSize();
    }

    void draw() override
    {
      adjustWidgets();  // Adjust widgets before drawing

      // Calling super class method draw()
      FDialog::draw();

      print() << FPoint (3, 3)
              << FColorPair (fc::Black, fc::White)
              << "Text on "
              << FColorPair (fc::Blue, fc::Yellow)
              << "top";
    }

    FLineEdit input{"Middle", this};
    FButton button{"&Bottom", this};
};

int main (int argc, char* argv[])
{
  FApplication app(argc, argv);
  dialogWidget dialog(&app);
  app.setMainWidget(&dialog);
  dialog.show();
  return app.exec();
}
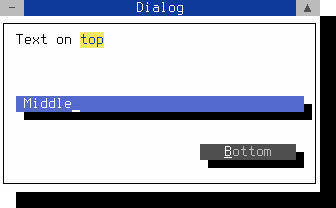
(Note: You can close the window with the mouse, Shift+F10 or Ctrl+^)
After entering the source code in size-adjustment.cpp you can compile the above program with gcc:
g++ -O2 -lfinal -std=c++11 size-adjustment.cpp -o size-adjustment
Scroll view
The scroll view of the FScrollView class allows users to view content
that is larger than the visible area. The FScrollView widget displays
the horizontal and vertical scroll bar by default, only if the content size
requires it. You can controll this behavior by the two methods
setHorizontalScrollBarMode() and setVerticalScrollBarMode().
setHorizontalScrollBarMode (fc::scrollBarMode);
setVerticalScrollBarMode (fc::scrollBarMode);
You pass the scroll bar visibility mode as a value of the enum type
fc::scrollBarMode.
enum scrollBarMode
{
  Auto   = 0,  // Shows a scroll bar when area is larger than viewport
  Hidden = 1,  // Never shows a scroll bar
  Scroll = 2   // Always shows a scroll bar
};
You can add widgets to an FScrollView object as child objects and place
them (with a widget positioning method) on the scrollable area. If a client
widget gets the focus, it automatically scrolls the viewport to the focused
widget. You can use the methods scrollTo(), scrollToX(), scrollToY()
and scrollBy() to set the scroll position of the viewport directly.
The FButtonGroup widget uses FScrollView to display more buttons
in the frame than the height allows.
File: scrollview.cpp
#include <utility>
#include <final/final.h>

using namespace finalcut;

class dialogWidget : public FDialog
{
  public:
    explicit dialogWidget (FWidget* parent = nullptr)
      : FDialog(parent)
    {
      setText ("Dialog");
      setGeometry (FPoint(28, 2), FSize(24, 21));
      scrollview.setGeometry(FPoint(1, 1), FSize(22, 11));
      scrollview.setScrollSize(FSize(60, 27));
      const auto& wc = getFWidgetColors();
      setColor (wc.label_inactive_fg, wc.dialog_bg);
      scrollview.clearArea();
      FColorPair red (fc::LightRed, wc.dialog_bg);
      FColorPair black (fc::Black, wc.dialog_bg);
      FColorPair cyan (fc::Cyan, wc.dialog_bg);

      static std::vector<direction> d
      {
        {"NW", FPoint(3,  13), FPoint(1,  1),  black},
        {"N",  FPoint(10, 13), FPoint(21, 1),  red},
        {"NE", FPoint(17, 13), FPoint(41, 1),  black},
        {"W",  FPoint(3,  15), FPoint(1,  10), black},
        {"*",  FPoint(10, 15), FPoint(21, 10), black},
        {"E",  FPoint(17, 15), FPoint(41, 10), black},
        {"SW", FPoint(3,  17), FPoint(1,  19), black},
        {"S",  FPoint(10, 17), FPoint(21, 19), cyan},
        {"SE", FPoint(17, 17), FPoint(41, 19), black}
      };

      for (auto&& b : d)
      {
        scrollview.print() << std::get<2>(b) + FPoint(10, 5)
                           << std::get<3>(b) << std::get<0>(b);
        auto edit = new FLineEdit("direction " + std::get<0>(b), &scrollview);
        edit->setGeometry(std::get<2>(b) + FPoint(1, 1), FSize(17, 1));
        auto btn = new FButton(std::get<0>(b), this);
        btn->setGeometry(std::get<1>(b), FSize(4, 1));
        btn->unsetShadow();
        btn->addCallback
        (
          "clicked",
          F_METHOD_CALLBACK (this, &dialogWidget::cb_button),
          static_cast<FDataPtr>(&std::get<2>(b))
        );
      };
    }

  private:
    typedef std::tuple<FString, FPoint, FPoint, FColorPair> direction;

    void cb_button (FWidget*, FDataPtr data)
    {
      FPoint* p = static_cast<FPoint*>(data);
      scrollview.scrollTo(*p);
    }

    FScrollView scrollview{this};
};

int main (int argc, char* argv[])
{
  FApplication app(argc, argv);
  dialogWidget dialog(&app);
  app.setMainWidget(&dialog);
  dialog.show();
  return app.exec();
}
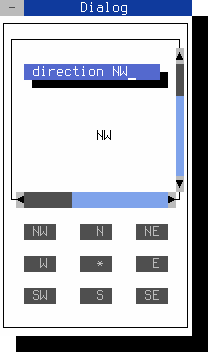
(Note: You can close the window with the mouse, Shift+F10 or Ctrl+^)
After entering the source code in scrollview.cpp you can compile the above program with gcc:
g++ -O2 -lfinal -std=c++11 scrollview.cpp -o scrollview